When it comes to e-bike safety, nothing is more important than good brakes. Whether you're cruising city streets or descending steep trails, responsive stopping power can be the difference between a smooth ride and a serious accident.
Most e-bikes use either mechanical (cable) or hydraulic disc brakes. Each type has its quirks, but the good news? You don’t need to be a pro mechanic to keep them working properly.
In this beginner-friendly guide, we’ll walk you through everything you need to know to inspect, adjust, and maintain your e-bike brakes—step by step.
Tools You’ll Need
Before you get started, gather a few basic tools to make the job easier:
- Allen wrenches (commonly 4mm and 5mm)
- Screwdriver (Phillips or flathead, depending on your components)
- Bike stand (optional, but helpful)
- Clean rag + isopropyl alcohol (for cleaning rotors)
- Bike lubricant (only for mechanical cables—not for pads or rotors!)
- Torque wrench (helps tighten bolts to manufacturer specs)
- Brake pad alignment tool (optional, great for beginners)
Pro Tip: Don’t use WD-40 or regular oil near your brake system—it can ruin your stopping power fast.
Understanding Mechanical vs. Hydraulic Brakes
Mechanical Disc Brakes
- Work using a steel cable that pulls the brake caliper.
- Easier to adjust and maintain.
- Common on budget-friendly or commuter e-bikes.
Hydraulic Disc Brakes
- Use fluid pressure to squeeze the brake pads.
- Offer stronger, smoother stopping with less hand effort.
- More common on performance and mountain e-bikes.
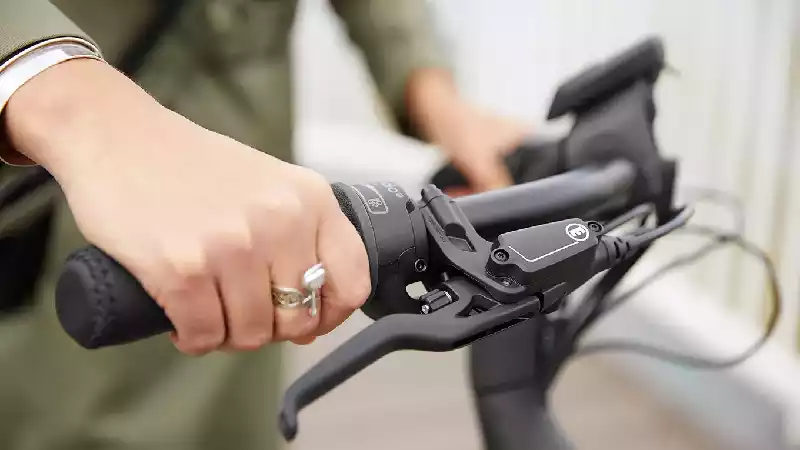
If you're not sure which type you have, squeeze the brake lever and look at the caliper. If there's a cable attached, it's mechanical. If not (or if you see brake fluid lines), it's hydraulic.
How to Inspect Your E-Bike Brakes
Visual Inspection
Start by checking:
- Brake pads: If they're thinner than a credit card (around 1.5mm), it's time to replace them.
- Rotors: Look for warping, grooves, or discoloration.
- Cables or hoses: Make sure they’re not frayed, cracked, or leaking.
Rotor Clearance Check
Spin each wheel and listen. If you hear a light rubbing sound, your rotor might be slightly misaligned.
Brake Lever Feel
Squeeze the levers:
- Too soft or spongy? Might be air in a hydraulic system or a loose mechanical cable.
- Too tight or sluggish? May need a pad adjustment or fresh cable tension.
Adjusting Mechanical Disc Brakes
Center the Caliper
- Loosen the two bolts holding the brake caliper.
- Squeeze the brake lever firmly (this centers the caliper).
- While holding the lever, tighten both bolts evenly.
Adjust the Pad Clearance
Use the barrel adjuster at the lever or caliper to fine-tune cable tension:
- Turn counterclockwise to tighten (less lever travel).
- Turn clockwise to loosen (more lever travel).
Some calipers have pad adjustment dials you can turn to move the pads closer or farther from the rotor.
Check Cable Tension
If braking still feels weak:
- Loosen the bolt that holds the cable at the caliper.
- Pull the cable tighter, then retighten the bolt.
- Be careful not to over-tighten—it can lead to brake drag.
Adjusting Hydraulic Disc Brakes
Check and Center the Caliper
Same as with mechanical:
- Loosen the caliper bolts.
- Squeeze the brake lever to align.
- Tighten the bolts evenly.
Adjust Lever Reach
Some hydraulic levers have a reach adjustment screw near the pivot point. Turn it to bring the lever closer or farther from the handlebar to fit your hand size.
Bleed the Brakes (If Needed)
If your levers feel mushy or you’ve lost power:
- You might need to bleed the system to remove air bubbles.
- This is a more advanced step—check your brake brand’s official bleed kit instructions or ask a bike shop for help.
Pro Tip: Store your e-bike upright when not in use. Laying it sideways (especially with hydraulic brakes) can cause air to move into the brake lines.
When to Replace Pads or Rotors
Don’t wait for your brakes to fail—check these signs:
- Pads: Less than 1.5mm of material, uneven wear, or contamination (e.g., oil or dirt).
- Rotors: Deep grooves, warping, or vibration while braking.
- Many rotors have a minimum thickness stamped—replace if below spec.
Quick Safety Checks Before Every Ride
Before every trip, give your brakes a quick once-over:
- Squeeze both levers—feel solid?
- Spin the wheels—any rubbing?
- Check pad clearance and rotor wear.
It only takes 30 seconds, and it might prevent a crash.
Final Thoughts
Your e-bike’s brakes are your best friend when things get fast—or sketchy. Whether you’re running mechanical or hydraulic systems, learning how to check and adjust them gives you more confidence, more safety, and more freedom to ride.
Brake maintenance might seem technical at first, but once you get the hang of it, it becomes part of the rhythm of being an e-bike rider.
Ready to ride smarter and safer? Keep your brakes sharp, and your adventures smooth.
Understanding Your Brake Type
Not all e-bike brakes are created equal. Knowing the type of brake system your e-bike uses will help you understand how it works—and how to maintain it. The two most common types are mechanical disc brakes and hydraulic disc brakes, and each has its own pros, cons, and maintenance needs.
Mechanical Disc Brakes
Mechanical disc brakes work using a steel cable that pulls the brake caliper when you squeeze the lever. The caliper then pushes the brake pads against the rotor, slowing down your e-bike.
- These are simpler to adjust and maintain.
- You’ll often find them on budget-friendly or entry-level e-bikes.
- Since they use a cable, the feel can vary as cables stretch over time.
Pro Tip: If your brake lever starts feeling loose or you hear rubbing, it might be time for a quick cable adjustment or pad alignment.
Hydraulic Disc Brakes
Hydraulic disc brakes use fluid-filled brake lines to transfer pressure from the lever to the caliper. This system allows for smoother braking and stronger stopping power with less effort from your hands.
- Typically found on mid-range to high-performance e-bikes.
- Great for riders who want better modulation and control.
- They require less frequent adjustment but can be harder to DIY if they need a brake bleed.
While hydraulic systems feel smoother, they do require a bit more care—especially if you’re riding in extreme temperatures or off-road environments.
Step-by-Step: Inspecting Your E-Bike Brakes
Before adjusting anything, it’s smart to inspect your brakes regularly. These quick checks can help prevent bigger problems down the road—and keep you safe on every ride.
Visual Inspection
A quick visual check can reveal a lot. Here's what to look for:
- Brake pad wear: Pads should have more than 1.5mm of material left. If they’re thinner than a dime, it’s time to replace them.
- Rotor condition: Look for signs of warping (a wobbly spin), deep grooves, or scoring.
- Hydraulic fluid leaks: Any oily residue around the brake lever or caliper could mean a seal is leaking.
- Mechanical cable condition: Check for frayed cables or kinks that could affect performance.
Pro Tip: Wipe down your rotors with isopropyl alcohol once a week. Dirty rotors can cause noise and reduce braking efficiency.
Rotor Check
Spin your e-bike's wheels and watch the rotor (the round disc) closely.
- It should spin smoothly without rubbing against the brake pads.
- If it scrapes or pulses, the rotor might be slightly bent—or the caliper may need alignment.
- Gently squeeze the brake lever and make sure both brake pads engage evenly.
This is one of the easiest ways to catch a problem before it affects your ride.
Brake Lever Test
The way your brake levers feel can tell you a lot:
- They should feel firm and responsive, not squishy or loose.
- On mechanical systems, excess lever travel can mean the cable has stretched or the pads are too far apart.
- On hydraulic systems, soft or spongy levers can mean there’s air in the line and the brakes may need to be bled.
A firm brake lever means reliable stopping power—something you always want when riding fast or downhill.
Once you’ve completed these checks, you’ll be ready to start making precise adjustments to improve brake feel, eliminate rubbing, or restore stopping power. Stay tuned for the next steps in adjusting both mechanical and hydraulic e-bike brakes with confidence.
Adjusting Mechanical Disc Brakes
Getting your mechanical disc brakes dialed in right means smoother, safer stops—and it’s easier than you might think. With just a few simple tweaks, you can eliminate rubbing and improve brake feel.
Centering the Caliper
Start by loosening the two bolts that hold the brake caliper to the frame or fork—just enough so it can move side to side.
Next, squeeze the brake lever firmly. This action pulls the caliper into the perfect position, centering the brake pads evenly around the rotor.
While holding the lever, retighten the caliper bolts evenly. This locks the caliper in place so your brakes won’t rub.
Pad Clearance Adjustment
Sometimes the brake pads sit too close or too far from the rotor, causing noise or weak braking.
Use the barrel adjuster—a small dial near the brake lever or caliper—to make fine cable tension tweaks. Turning it counterclockwise tightens the cable, bringing pads closer; clockwise loosens it.
Some calipers have inner and outer pad adjustment knobs you can turn to position pads just right.
The goal is to make sure the pads don’t rub the rotor when the brake is released, but still engage quickly when you squeeze the lever.
Cable Tension
If your brakes feel spongy or have too much lever travel, check the cable tension at the caliper.
Loosen the bolt that holds the cable, pull the cable tight (but not overly tight), then retighten the bolt securely.
Avoid overtightening—too much tension can cause the brakes to drag and wear pads prematurely.
Adjusting Hydraulic Disc Brakes
Hydraulic brakes are great for strong, smooth stopping power, but adjusting them takes a slightly different approach.
Lever Feel Adjustment
Many hydraulic brake levers have a reach adjustment screw near the pivot point.
Turning this screw lets you set how far the lever sits from your handlebar—perfect for riders with smaller hands or anyone who wants more comfort and control.
Pad Alignment
Just like mechanical brakes, hydraulic calipers need to be centered.
Loosen the caliper mounting bolts slightly, squeeze the brake lever firmly to center the pads around the rotor, and then retighten the bolts evenly.
If you still hear rubbing, you can fine-tune the caliper position manually using a small pad alignment tool.
Bleeding the Brakes (If Needed)
If your brake lever feels soft, spongy, or inconsistent, it may be time to bleed your brakes—removing trapped air in the hydraulic lines.
This step requires some tools and care, so if you’re new to hydraulic maintenance, it’s a good idea to follow a detailed bleeding guide or take your bike to a trusted shop.
Pro Tip: Regularly check your brake lever feel, especially after long rides or rough terrain. Early attention prevents brake issues and keeps you riding confidently.
Keeping your e-bike’s brakes in top shape is easier than you think. Whether mechanical or hydraulic, a little adjustment goes a long way to safer, smoother rides.
Ready to master your e-bike maintenance? Keep learning, keep riding, and enjoy every safe stop along the way!
When to Replace Brake Pads or Rotors
Knowing when to replace your e-bike’s brake pads or rotors is key to staying safe and maintaining strong stopping power.
- Brake pads: Replace when the pad material is 1.5mm thick or less. Worn pads reduce braking efficiency and can damage rotors.
- Watch for pads that show signs of glazing (a shiny, hardened surface), cracking, or contamination from oil or dirt.
- Rotors need replacement if you spot deep grooves, noticeable warping, or if they’re thinner than the manufacturer’s minimum thickness specification.
Regularly checking these parts helps you avoid costly repairs and dangerous riding conditions.
Pro Tips for Better Brake Performance
Keeping your brakes in top shape doesn’t have to be complicated. Follow these simple tips for smooth, reliable stops:
- Clean rotors regularly with isopropyl alcohol to remove dirt and oil buildup. This prevents squealing and keeps brakes responsive.
- Avoid touching rotors or brake pads with your bare hands—skin oils can contaminate the surfaces and reduce friction.
- Never spray lubricant near brake components. Lubricants can cause serious brake failure if they get on pads or rotors.
- Always check your brakes before long rides or after riding in rain or muddy conditions. Moisture and grime can affect performance, so a quick inspection goes a long way.
Pro Tip: A quick wipe of your rotors before a ride can drastically reduce noise and improve stopping power.
Regular brake maintenance keeps your e-bike safe, fun, and ready for any adventure. Ready to ride with confidence? Keep your brakes sharp, and enjoy every mile!
Common Mistakes to Avoid
Even small slip-ups can lead to brake problems or safety issues. Here are some common mistakes to watch out for:
- Over-tightening caliper bolts: Too much torque can strip threads or warp your rotors.
- Ignoring rubbing sounds: Persistent noise often means your brakes need adjustment—don’t let it slide.
- Mixing hydraulic fluid types: Using the wrong brake fluid can damage seals and reduce braking power.
- Touching braking surfaces during maintenance: Oils from your skin can contaminate pads and rotors, leading to poor performance.
Being aware of these pitfalls helps you maintain strong, reliable brakes and avoid costly repairs.
Final Thoughts
Routine brake checks are essential for every e-bike rider. Taking just a few minutes to inspect and adjust your brakes keeps you safer and boosts your riding confidence.
If you’re new to brake maintenance, practice adjustments in a calm, safe space until you feel comfortable.
And remember—if you’re ever unsure or notice persistent performance issues, don’t hesitate to bring your e-bike to a professional mechanic. Expert help ensures your brakes stay in top shape so you can enjoy every ride worry-free.
Ready to ride safer and smarter? Keep your brakes sharp and your adventures smooth!


