When it comes to e-bike safety, nothing is more important than good brakes. Whether you're cruising city streets or descending steep trails, responsive stopping power can be the difference between a smooth ride and a serious accident.
Most e-bikes use either mechanical (cable) or hydraulic disc brakes. Each type has its quirks, but the good news? You don’t need to be a pro mechanic to keep them working properly.
In this beginner-friendly guide, we’ll walk you through everything you need to know to inspect, adjust, and maintain your e-bike brakes—step by step.
Before you get started, gather a few basic tools to make the job easier:
Pro Tip: Don’t use WD-40 or regular oil near your brake system—it can ruin your stopping power fast.
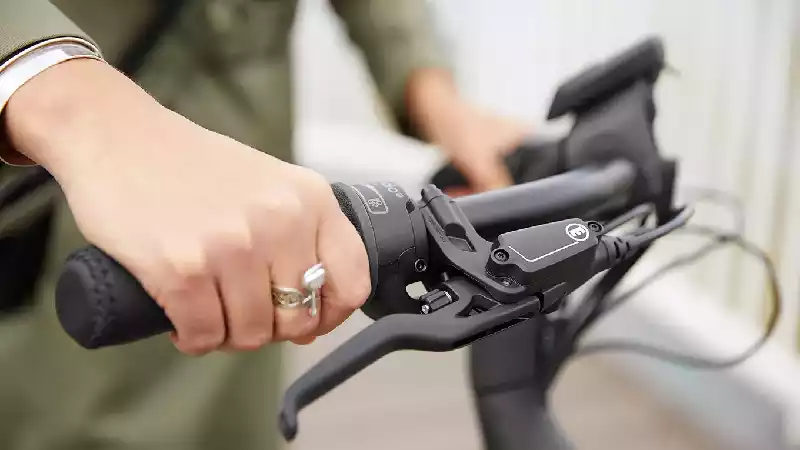
If you're not sure which type you have, squeeze the brake lever and look at the caliper. If there's a cable attached, it's mechanical. If not (or if you see brake fluid lines), it's hydraulic.
Start by checking:
Spin each wheel and listen. If you hear a light rubbing sound, your rotor might be slightly misaligned.
Squeeze the levers:
Use the barrel adjuster at the lever or caliper to fine-tune cable tension:
Some calipers have pad adjustment dials you can turn to move the pads closer or farther from the rotor.
If braking still feels weak:
Same as with mechanical:
Some hydraulic levers have a reach adjustment screw near the pivot point. Turn it to bring the lever closer or farther from the handlebar to fit your hand size.
If your levers feel mushy or you’ve lost power:
Pro Tip: Store your e-bike upright when not in use. Laying it sideways (especially with hydraulic brakes) can cause air to move into the brake lines.
Don’t wait for your brakes to fail—check these signs:
Before every trip, give your brakes a quick once-over:
It only takes 30 seconds, and it might prevent a crash.
Your e-bike’s brakes are your best friend when things get fast—or sketchy. Whether you’re running mechanical or hydraulic systems, learning how to check and adjust them gives you more confidence, more safety, and more freedom to ride.
Brake maintenance might seem technical at first, but once you get the hang of it, it becomes part of the rhythm of being an e-bike rider.
Ready to ride smarter and safer? Keep your brakes sharp, and your adventures smooth.
Understanding Your Brake Type
Not all e-bike brakes are created equal. Knowing the type of brake system your e-bike uses will help you understand how it works—and how to maintain it. The two most common types are mechanical disc brakes and hydraulic disc brakes, and each has its own pros, cons, and maintenance needs.
Mechanical disc brakes work using a steel cable that pulls the brake caliper when you squeeze the lever. The caliper then pushes the brake pads against the rotor, slowing down your e-bike.
Pro Tip: If your brake lever starts feeling loose or you hear rubbing, it might be time for a quick cable adjustment or pad alignment.
Hydraulic disc brakes use fluid-filled brake lines to transfer pressure from the lever to the caliper. This system allows for smoother braking and stronger stopping power with less effort from your hands.
While hydraulic systems feel smoother, they do require a bit more care—especially if you’re riding in extreme temperatures or off-road environments.
Before adjusting anything, it’s smart to inspect your brakes regularly. These quick checks can help prevent bigger problems down the road—and keep you safe on every ride.
A quick visual check can reveal a lot. Here's what to look for:
Pro Tip: Wipe down your rotors with isopropyl alcohol once a week. Dirty rotors can cause noise and reduce braking efficiency.
Spin your e-bike's wheels and watch the rotor (the round disc) closely.
This is one of the easiest ways to catch a problem before it affects your ride.
The way your brake levers feel can tell you a lot:
A firm brake lever means reliable stopping power—something you always want when riding fast or downhill.
Once you’ve completed these checks, you’ll be ready to start making precise adjustments to improve brake feel, eliminate rubbing, or restore stopping power. Stay tuned for the next steps in adjusting both mechanical and hydraulic e-bike brakes with confidence.
Getting your mechanical disc brakes dialed in right means smoother, safer stops—and it’s easier than you might think. With just a few simple tweaks, you can eliminate rubbing and improve brake feel.
Start by loosening the two bolts that hold the brake caliper to the frame or fork—just enough so it can move side to side.
Next, squeeze the brake lever firmly. This action pulls the caliper into the perfect position, centering the brake pads evenly around the rotor.
While holding the lever, retighten the caliper bolts evenly. This locks the caliper in place so your brakes won’t rub.
Sometimes the brake pads sit too close or too far from the rotor, causing noise or weak braking.
Use the barrel adjuster—a small dial near the brake lever or caliper—to make fine cable tension tweaks. Turning it counterclockwise tightens the cable, bringing pads closer; clockwise loosens it.
Some calipers have inner and outer pad adjustment knobs you can turn to position pads just right.
The goal is to make sure the pads don’t rub the rotor when the brake is released, but still engage quickly when you squeeze the lever.
If your brakes feel spongy or have too much lever travel, check the cable tension at the caliper.
Loosen the bolt that holds the cable, pull the cable tight (but not overly tight), then retighten the bolt securely.
Avoid overtightening—too much tension can cause the brakes to drag and wear pads prematurely.
Hydraulic brakes are great for strong, smooth stopping power, but adjusting them takes a slightly different approach.
Many hydraulic brake levers have a reach adjustment screw near the pivot point.
Turning this screw lets you set how far the lever sits from your handlebar—perfect for riders with smaller hands or anyone who wants more comfort and control.
Just like mechanical brakes, hydraulic calipers need to be centered.
Loosen the caliper mounting bolts slightly, squeeze the brake lever firmly to center the pads around the rotor, and then retighten the bolts evenly.
If you still hear rubbing, you can fine-tune the caliper position manually using a small pad alignment tool.
If your brake lever feels soft, spongy, or inconsistent, it may be time to bleed your brakes—removing trapped air in the hydraulic lines.
This step requires some tools and care, so if you’re new to hydraulic maintenance, it’s a good idea to follow a detailed bleeding guide or take your bike to a trusted shop.
Pro Tip: Regularly check your brake lever feel, especially after long rides or rough terrain. Early attention prevents brake issues and keeps you riding confidently.
Keeping your e-bike’s brakes in top shape is easier than you think. Whether mechanical or hydraulic, a little adjustment goes a long way to safer, smoother rides.
Ready to master your e-bike maintenance? Keep learning, keep riding, and enjoy every safe stop along the way!
Knowing when to replace your e-bike’s brake pads or rotors is key to staying safe and maintaining strong stopping power.
Regularly checking these parts helps you avoid costly repairs and dangerous riding conditions.
Keeping your brakes in top shape doesn’t have to be complicated. Follow these simple tips for smooth, reliable stops:
Pro Tip: A quick wipe of your rotors before a ride can drastically reduce noise and improve stopping power.
Regular brake maintenance keeps your e-bike safe, fun, and ready for any adventure. Ready to ride with confidence? Keep your brakes sharp, and enjoy every mile!
Even small slip-ups can lead to brake problems or safety issues. Here are some common mistakes to watch out for:
Being aware of these pitfalls helps you maintain strong, reliable brakes and avoid costly repairs.
Routine brake checks are essential for every e-bike rider. Taking just a few minutes to inspect and adjust your brakes keeps you safer and boosts your riding confidence.
If you’re new to brake maintenance, practice adjustments in a calm, safe space until you feel comfortable.
And remember—if you’re ever unsure or notice persistent performance issues, don’t hesitate to bring your e-bike to a professional mechanic. Expert help ensures your brakes stay in top shape so you can enjoy every ride worry-free.
Ready to ride safer and smarter? Keep your brakes sharp and your adventures smooth!
Ever been frustrated when your e-bike battery dies halfway through your ride? You’re not alone. Understanding what range means is key to getting the most from your electric bike.
Simply put, range is how far your e-bike can travel on a single charge. This depends on the battery size, your riding style, the terrain, and even the weather. The good news? You can boost your range with a few smart choices.
In this e-bike buying guide, we’ll cover:
Your riding style plays a huge role in how far your e-bike can go.
Pedal assist means the motor helps you as you pedal — it’s more efficient and uses less battery than holding the throttle constantly. Try to:
Every time you accelerate quickly or brake hard, your battery drains faster. A smooth, steady pace is easier on your battery and your muscles.
Pro Tip: Plan your route to avoid stop-and-go traffic or hills when possible. Riding on flatter terrain will stretch your battery range.
Taking care of your battery can add miles to every charge.
If you want to push your e-bike even further, consider these upgrades.
Many brands offer extended-range batteries with higher watt-hours (Wh). For example:
Make sure your bike’s frame and motor support bigger batteries before upgrading.
Switching to thinner tires designed for roads can reduce rolling resistance and improve range. Also, mid-drive motors use power more efficiently on hills compared to hub motors.
You don’t have to settle for short trips. By adjusting your riding habits, caring for your battery, and upgrading smartly, you can enjoy longer rides and greater freedom.
Ready to find the best e-bikes for your lifestyle? Check out some 2025 electric bike reviews and start your journey toward smarter, longer rides today.
What Impacts Your E-Bike’s Range? Understanding the Key Factors
Want to get the most out of your e-bike? Learn what affects your electric bike’s range, from battery capacity to rider habits, in this clear 2025 electric bike review.
Thinking about how far your e-bike can take you? Knowing the factors that impact range helps you choose the best e-bikes for your needs and ride smarter.
Range isn’t just about the battery size—it’s a mix of several important things working together. Let’s break them down.
Your e-bike’s battery is measured in two main ways:
Simply put, higher Wh means more power and longer rides. For example, a 500Wh battery will generally give you less range than a 700Wh battery.
Not all motors are created equal. The efficiency of your e-bike’s motor affects how much battery power turns into movement.
How you use your e-bike influences battery drain more than you might think.
Pro Tip: Try experimenting with different assist settings to find the sweet spot between effort and battery life.
The environment plays a big role in your e-bike’s range.
The combined weight of you, your gear, and accessories impacts battery use.
Understanding these factors helps you make confident choices when buying an e-bike and planning your rides. Whether you want the best e-bikes for commuters or are comparing the latest 2025 electric bike reviews, knowing what impacts range will guide you to smarter decisions.
Ready to find the perfect e-bike that matches your lifestyle? Start exploring options with your new knowledge and get ready to enjoy longer, smoother rides!
Maximizing your e-bike’s range isn’t just about the battery or motor—it starts with how you ride. Small changes in your habits can lead to big improvements in battery life and overall ride enjoyment.
Here’s what you can do to stretch your range every time you hop on.
The pedal-assist system helps you pedal with motor power. The higher the assist level, the more battery power you use.
This simple shift can add miles to your ride without making you feel like you’re working too hard.
Stop-and-go riding drains your battery quickly because every acceleration requires extra power.
Maintaining momentum is key to using less battery power.
Riding at a steady pace reduces strain on your motor and battery.
Shifting gears helps your legs and motor work together efficiently.
Good gear management keeps your ride smooth and your battery healthier.
Pro Tip: Practice shifting before you hit challenging terrain so your ride feels effortless.
Your environment affects how hard your e-bike has to work.
Planning smarter routes can make your rides longer and more enjoyable.
By adjusting your riding habits—using lower assist, coasting more, maintaining steady speeds, shifting gears smartly, and planning easy routes—you’ll get the most out of your battery and enjoy longer adventures.
Ready to explore the best e-bikes for your riding style? Check out the latest e-bike buying guide and make your next ride your best yet!
Regular Maintenance for Maximum E-Bike Efficiency
Keep your e-bike running smooth and maximize battery life with simple maintenance tips like tire care, chain lubrication, and firmware updates in this 2025 electric bike review.
Taking care of your e-bike isn’t just about looks—it’s about making sure every ride is efficient and enjoyable. Small maintenance tasks can help your bike run smoother, save battery power, and last longer.
Here’s what you need to focus on regularly.
Tires with the right air pressure roll easier and use less energy.
Pro Tip: Invest in a portable pump or electric inflator to keep your tires in top shape anywhere.
A clean, well-lubricated chain means your motor’s power reaches the wheels efficiently.
Misaligned brakes or rubbing pads create resistance, wasting battery power.
Some e-bikes come with software that controls the motor and battery management.
Regular maintenance like inflating tires, lubricating the chain, checking brakes, and updating software keeps your e-bike running efficiently and extends battery life.
Want to learn more about the best e-bikes for commuters or beginners? Explore up-to-date 2025 electric bike reviews and get ready to ride smarter and farther!
DIY Upgrades That Can Help You Ride Farther and Smarter
Looking to squeeze even more miles out of your e-bike? Some simple upgrades can boost your range, comfort, and overall ride experience without breaking the bank.
Here’s how to get started.
The easiest way to extend your e-bike’s range is by upgrading to a bigger battery.
Pro Tip: A higher-capacity battery usually means added weight—balance range needs with bike handling.
Switching tires can make a big difference in how far your bike rolls on a charge.
Cutting weight helps your motor work less, saving battery life.
For serious range hunters, some e-bikes support dual batteries or external range extenders.
DIY upgrades like bigger batteries, better tires, lighter parts, and range extenders help you get the most from your e-bike. Whether you’re searching for the best e-bikes for commuters or exploring the latest 2025 electric bike reviews, these upgrades can tailor your ride to your lifestyle.
Ready to take your e-bike to the next level? Find the perfect model and gear up for longer, more enjoyable rides!
Looking to push your e-bike’s range even further? These bonus tips are perfect for riders who want every last mile out of their battery.
Every extra pound makes your motor work harder.
Riding close behind another cyclist reduces air drag.
Batteries perform better when they’re warm.
Pro Tip: If you ride in cold weather, try storing your battery indoors before heading out to keep it warm.
These extra steps—lightening your load, drafting smartly, and riding in warmer temps—can add surprising boosts to your e-bike’s range. Whether you’re eyeing the best e-bikes for long-distance riders or comparing the latest 2025 electric bike reviews, these tips help you ride farther and enjoy every journey.
Ready to unlock your e-bike’s full potential? Find the perfect model and hit the road with confidence!
Don’t let myths hold you back! Learn the truth about e-bike range and make confident choices with this clear 2025 electric bike review.
There’s a lot of misinformation out there about e-bike range. Knowing what’s true helps you get the most from your ride—and avoid surprises.
Let’s bust some common myths so you can make smarter decisions.
While it’s true that higher assist levels give you more power, they also drain your battery faster. Using turbo mode on every ride might get you up hills quickly, but it’ll shorten your overall range.
The truth? Tire width impacts rolling resistance, which affects battery life.
Choosing the right tires for your riding style is key to maximizing your range.
Batteries lose capacity with use and age—just like your phone.
Pro Tip: Monitor your battery health and be prepared to replace it after 3-5 years for peak performance.
Understanding the facts about assist modes, tire choice, and battery life helps you ride smarter and farther. Whether you’re exploring the best e-bikes for beginners or reading the latest 2025 electric bike reviews, busting these myths puts you in control.
Ready to choose the perfect e-bike and enjoy every mile? Dive into trusted guides and get riding with confidence!
Final Thoughts: Ride Smarter, Go Further
Ready to unlock the full potential of your e-bike? It all comes down to a few simple things: riding habits, regular care, and smart upgrades.
By using lower pedal-assist levels, keeping your bike well-maintained, and considering upgrades like a bigger battery or better tires, you can significantly extend your range and enjoy longer rides.
Every rider and route is different, so don’t hesitate to try out the tips that work best for you. Keep an eye on how far you go and how your battery performs. Small improvements add up fast!
Pro Tip: Use a bike computer or app to track your battery usage and distance — it’s the best way to see what changes make a real difference.
Why wait? Try one tip from this guide on your next ride and see how far you can go. Whether you’re browsing the best e-bikes for commuters or diving into the latest 2025 electric bike reviews, the right approach will make your ride more enjoyable and efficient.
Ready to ride? Find the perfect e-bike now and start exploring with confidence!
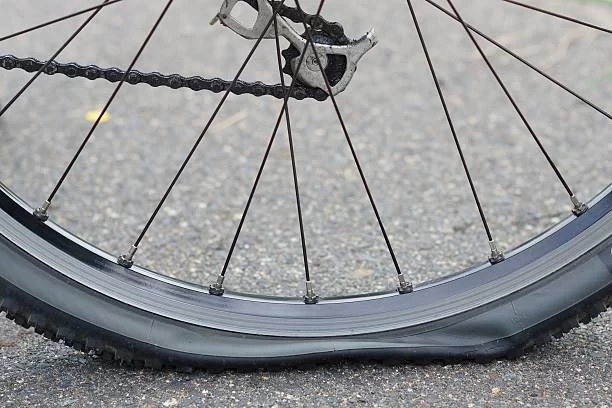
It’s happened to every rider at some point: you’re cruising along, feeling the wind on your face, when suddenly—you feel that dreaded wobble. A flat tire. But before panic sets in, know this: fixing a flat on an e-bike is easier than you might think.
Whether you're commuting, adventuring, or testing out one of the best e-bikes for beginners, learning to handle a flat is a must. This guide walks you through everything you need to repair or replace a flat tire—whether you’ve got a traditional inner tube or a modern tubeless setup.
A flat tire can leave you stranded if you're not prepared. E-bikes are heavier and more complex than standard bikes, so being able to fix a flat yourself saves time, money, and frustration. Even better? The tools are simple and lightweight—perfect for stashing in your saddlebag.
This guide covers:
Before you get started, gather these tools based on your tire type:
Pro Tip: Carry a compact repair kit and mini pump whenever you ride. It weighs less than a pound and could save you hours.
Knowing your tire type is the first step.
If you’re unsure, check your owner’s manual or ask the shop where you bought your bike.
This is the most common type of flat and pretty simple to handle.
Tubeless tires use liquid sealant inside the tire to automatically seal small holes. But for bigger punctures, you’ll need to intervene.
Pro Tip: If the hole is too large to seal, remove the tubeless valve and insert a standard inner tube to get home safely.
Sometimes, a quick fix isn’t enough. Replace the tire or tube if you notice:
The best flat is the one you never get. Here’s how to stack the odds in your favor:
Fixing a flat on your e-bike doesn’t have to be intimidating. With a little practice and the right gear, you’ll be back on two wheels in no time. Whether you're riding for fun, commuting to work, or exploring new trails, confidence in basic maintenance makes every ride smoother.
Want more tips like this or looking for the best e-bike for daily commuting or weekend adventures?
Check out our e-bike buying guide and find your perfect ride.
Ever tried to fix a flat only to realize you’re missing that one tool that makes the job ten times easier? Don’t let that happen mid-ride. Whether you're riding one of the best e-bikes for seniors, daily commuting, or heading out for a weekend adventure, having the right tools makes a flat tire a minor inconvenience—not a day-ender.
This section breaks down exactly what you’ll need to handle either an inner tube or tubeless flat like a pro.
If your e-bike uses inner tubes, you're working with the more traditional setup. Repairs are straightforward with the right tools in your kit.
Essentials:
Pro Tip: Want to be ultra-prepared? Carry both a spare tube and a patch kit—patch if you have time, replace if you’re in a rush.
Tubeless tires are a favorite on modern electric bikes thanks to their low rolling resistance and ability to self-seal small punctures. But when a sealant isn’t enough, you’ll need the following:
Must-Haves:
Pro Tip: If you ride off-road or long distances, make sure your tubeless sealant is fresh every 2–3 months. Old sealant dries out and won’t work when you need it most.
Having these tools ready—especially in a saddlebag or bike backpack—means you’re never stuck pushing your e-bike home. With a little preparation, even a flat tire can be just a small bump on your ride.
Looking for gear recommendations or want to compare models? Check out our e-bike buying guide to find the best tools and accessories for your ride style.
Before you can fix a flat on your e-bike, you need to know what kind of tire system you're working with. Most e-bikes use either inner tubes or tubeless tires, and how you fix a flat depends entirely on which setup you have.
The good news? It’s easy to figure out—even if you’re brand new to electric bikes.
Your e-bike’s owner’s manual or product page is the fastest way to confirm. But if you’re out riding or unsure, a quick visual check can give you a solid clue.
Here’s what to look for:
Pro Tip: Tubeless tires almost always have “Tubeless Ready” or “TLR” written on the tire sidewall.
Knowing your setup helps you pick the right tools, fix the flat correctly, and ride with confidence. You don’t want to be halfway through removing a tubeless tire only to realize you brought a patch kit meant for tubes.
If you’re still unsure after checking, most local bike shops can tell you in seconds—or help you switch to the setup that best fits your riding style.
Whether you're researching the best e-bikes for commuters or planning your first DIY repair, understanding your tire system is a key part of staying road-ready. Ready to dive into the actual repair steps? Let’s fix that flat!
Got a flat and confirmed you’re running inner tubes? Good news—it’s one of the most straightforward repairs you can do on an e-bike. With a few basic tools and a little patience, you’ll be back on two wheels in no time.
Here’s a breakdown of exactly how to fix it.
Before you do anything, safely lift your e-bike and flip it upside down or place it on a repair stand.
Pro Tip: Take a photo of how your motor cables are connected. It makes reassembly easier later—especially on the trail.
If the tire still has some air, fully deflate it by pressing the valve core.
Make sure you also pull the valve stem out of the rim.
Before installing a new tube, inspect everything.
If you skip this step, you risk popping your fresh tube in minutes.
Now it’s time to get rolling again.
Pro Tip: If the last section of the tire is tight, try squeezing the bead into the center channel of the rim to create slack.
With the tire fully seated:
A floor pump or portable e-bike pump with a gauge works best here.
Time to put everything back together.
Give the wheel a gentle spin to ensure nothing rubs or wobbles.
Before hitting the road:
And just like that—you’ve repaired your flat!
Fixing a tube might seem intimidating at first, especially on an electric bike, but it’s a great skill to have in your toolkit. Whether you're exploring new trails or using one of the best e-bikes for students, knowing how to fix a flat keeps you in control of your ride. Ready to learn how to handle tubeless setups next? Let’s keep rolling.
If your e-bike is rocking a tubeless tire setup, good news—you’re riding with one of the most puncture-resistant systems available. But even tubeless tires can get flats, especially from larger cuts or stubborn nails. The fix is a little different than with an inner tube, but it’s just as manageable with the right tools and a bit of know-how.
Here’s how to repair a tubeless flat and get rolling again fast.
The first step is pinpointing the puncture.
If you don’t see or hear anything obvious, you might have a slow leak and will need to inspect more closely under pressure.
Pro Tip: A little water or soapy spray on the tire can help make tiny leaks easier to find—bubbles will form where air escapes.
Now it’s time to seal it up.
The combo of the physical plug and sealant should stop most leaks on the spot.
If a lot of sealant leaked out or your tire has dried up inside, you’ll want to add more.
Sealant is the magic ingredient that keeps your tire self-healing. If your ride feels squishy or you’ve had multiple small flats, topping it off is a smart move.
To get that airtight seal again, you’ll need a powerful air source.
A regular hand pump might work, but if the bead isn’t seated, it won’t hold pressure. A CO₂ inflator is a good emergency backup if you're out on the road.
Before riding off:
Pro Tip: If the plug doesn’t hold, don’t stress. Just pop in a standard inner tube to get home and fully reseal your tubeless tire later.
A flat tubeless tire may seem like a big deal, but once you’ve done it once, it’s surprisingly quick—and way easier than dealing with tube replacements in the long run. Many of the best e-bikes for off-road or long-distance rides come tubeless-ready for a reason: fewer flats, smoother rides, and better performance.
Want to gear up with your own tubeless repair kit or upgrade your setup? Check out our latest e-bike buying guide and make every ride a worry-free one.
Emergency Tip: Using a Tube in a Tubeless Tire
Sometimes, no matter how many plugs you push in or how much sealant you add, a tubeless flat just won’t hold. Maybe the hole is too large, the sidewall is torn, or the bead won’t reseat. When that happens, don’t panic—there’s a reliable backup plan.
You can install a standard inner tube inside a tubeless tire to get home safely. It’s not ideal for long-term use, but it works great in a pinch.
Even though the tire is designed to run without one, most tubeless-ready rims and tires can accept a tube without issue. Here's how to do it:
Step-by-step:
Pro Tip: Clean out excess sealant with a rag before inserting the tube—old sealant can cause slipping or mess with the inflation.
Once the tube is in and holding air, you’re back on the road. However, this is just a temporary fix. Riding tubeless with a tube long-term can lead to issues like poor bead sealing or a bumpy ride.
After your ride, remove the tube and either:
This trick can be a ride-saver, especially if you're deep into a trail or far from help. Many of the best e-bikes for off-road riding come with tubeless setups for a reason—but even then, it's smart to carry a spare tube for peace of mind.
Want to know which gear is essential for trails, commuting, or long-distance travel? Explore our full e-bike buying guide and build your perfect setup from the ground up.
Not every flat tire can—or should—be fixed. While patch kits and plugs can work wonders, there are times when it’s better (and safer) to swap out the tire or tube entirely.
Knowing when to call it quits on a repair helps prevent future flats and keeps your e-bike riding smooth, whether you’re commuting to work or taking on rugged trails with one of the best e-bikes for mountain adventures.
If you notice any of the following, it’s time for a new tire or inner tube:
Pro Tip: Some tires have wear indicators—small grooves or dimples that disappear when the tire is worn down.
New tires aren’t just about preventing flats—they also improve performance, braking, and overall ride feel. A fresh tire can make your e-bike feel brand new again. And if you're riding one of the 2025 electric bike models with higher speeds or fat tires, safe rubber really matters.
Not sure what tire you need or how to choose between brands? Our full e-bike buying guide covers tire sizing, performance types, and maintenance tips to help you ride smarter and safer.
Fixing a flat is empowering—but preventing one in the first place? Even better. Whether you're commuting through the city or exploring off-road trails with one of the best e-bikes for weekend adventures, a few simple habits can go a long way in keeping your tires trouble-free.
Here’s how to stay ahead of punctures and keep your rides rolling smooth.
Underinflated tires are more likely to pinch flat or wear unevenly.
Low pressure might feel more comfortable, but it dramatically increases the risk of flats—especially if you hit a curb or pothole.
Tires matter more than you think.
Many of the 2025 electric bike reviews highlight models that come stock with tough tires, but even budget bikes can benefit from a quick upgrade.
Pro Tip: If you regularly ride through industrial zones or construction areas, tougher tires will pay for themselves fast in saved repairs.
Tubeless tires rely on sealant to do their magic.
It may sound obvious, but where you ride matters.
A little care goes a long way. With the right tires, smart habits, and regular maintenance, flats can become a rare event—not a constant worry. Want to gear up with the best tools, tires, or flat-prevention accessories? Our updated e-bike buying guide has everything you need to keep your ride rolling strong.
Flat tires are a part of bike life—even for the sleekest and most advanced e-bikes. But the good news? You don’t have to fear them. Knowing how to fix a flat, whether you ride with inner tubes or a tubeless setup, gives you the confidence to ride farther and smarter.
Make it a habit to carry a compact repair kit on every ride. A small bag with tire levers, a tube or plug kit, a mini pump, and sealant can turn a potential walk home into a quick pit stop. Many of the best e-bikes for commuters and weekend riders even have room for built-in storage or tool mounts.
And don’t forget the basics—check your tire pressure regularly, inspect for wear, and keep your gear fresh. Preventing flats is just as important as knowing how to fix them.
Ready to ride with confidence? Explore our full e-bike buying guide to find essential tools, upgrade your tires, or discover your next ride. A little preparation today means more freedom tomorrow.
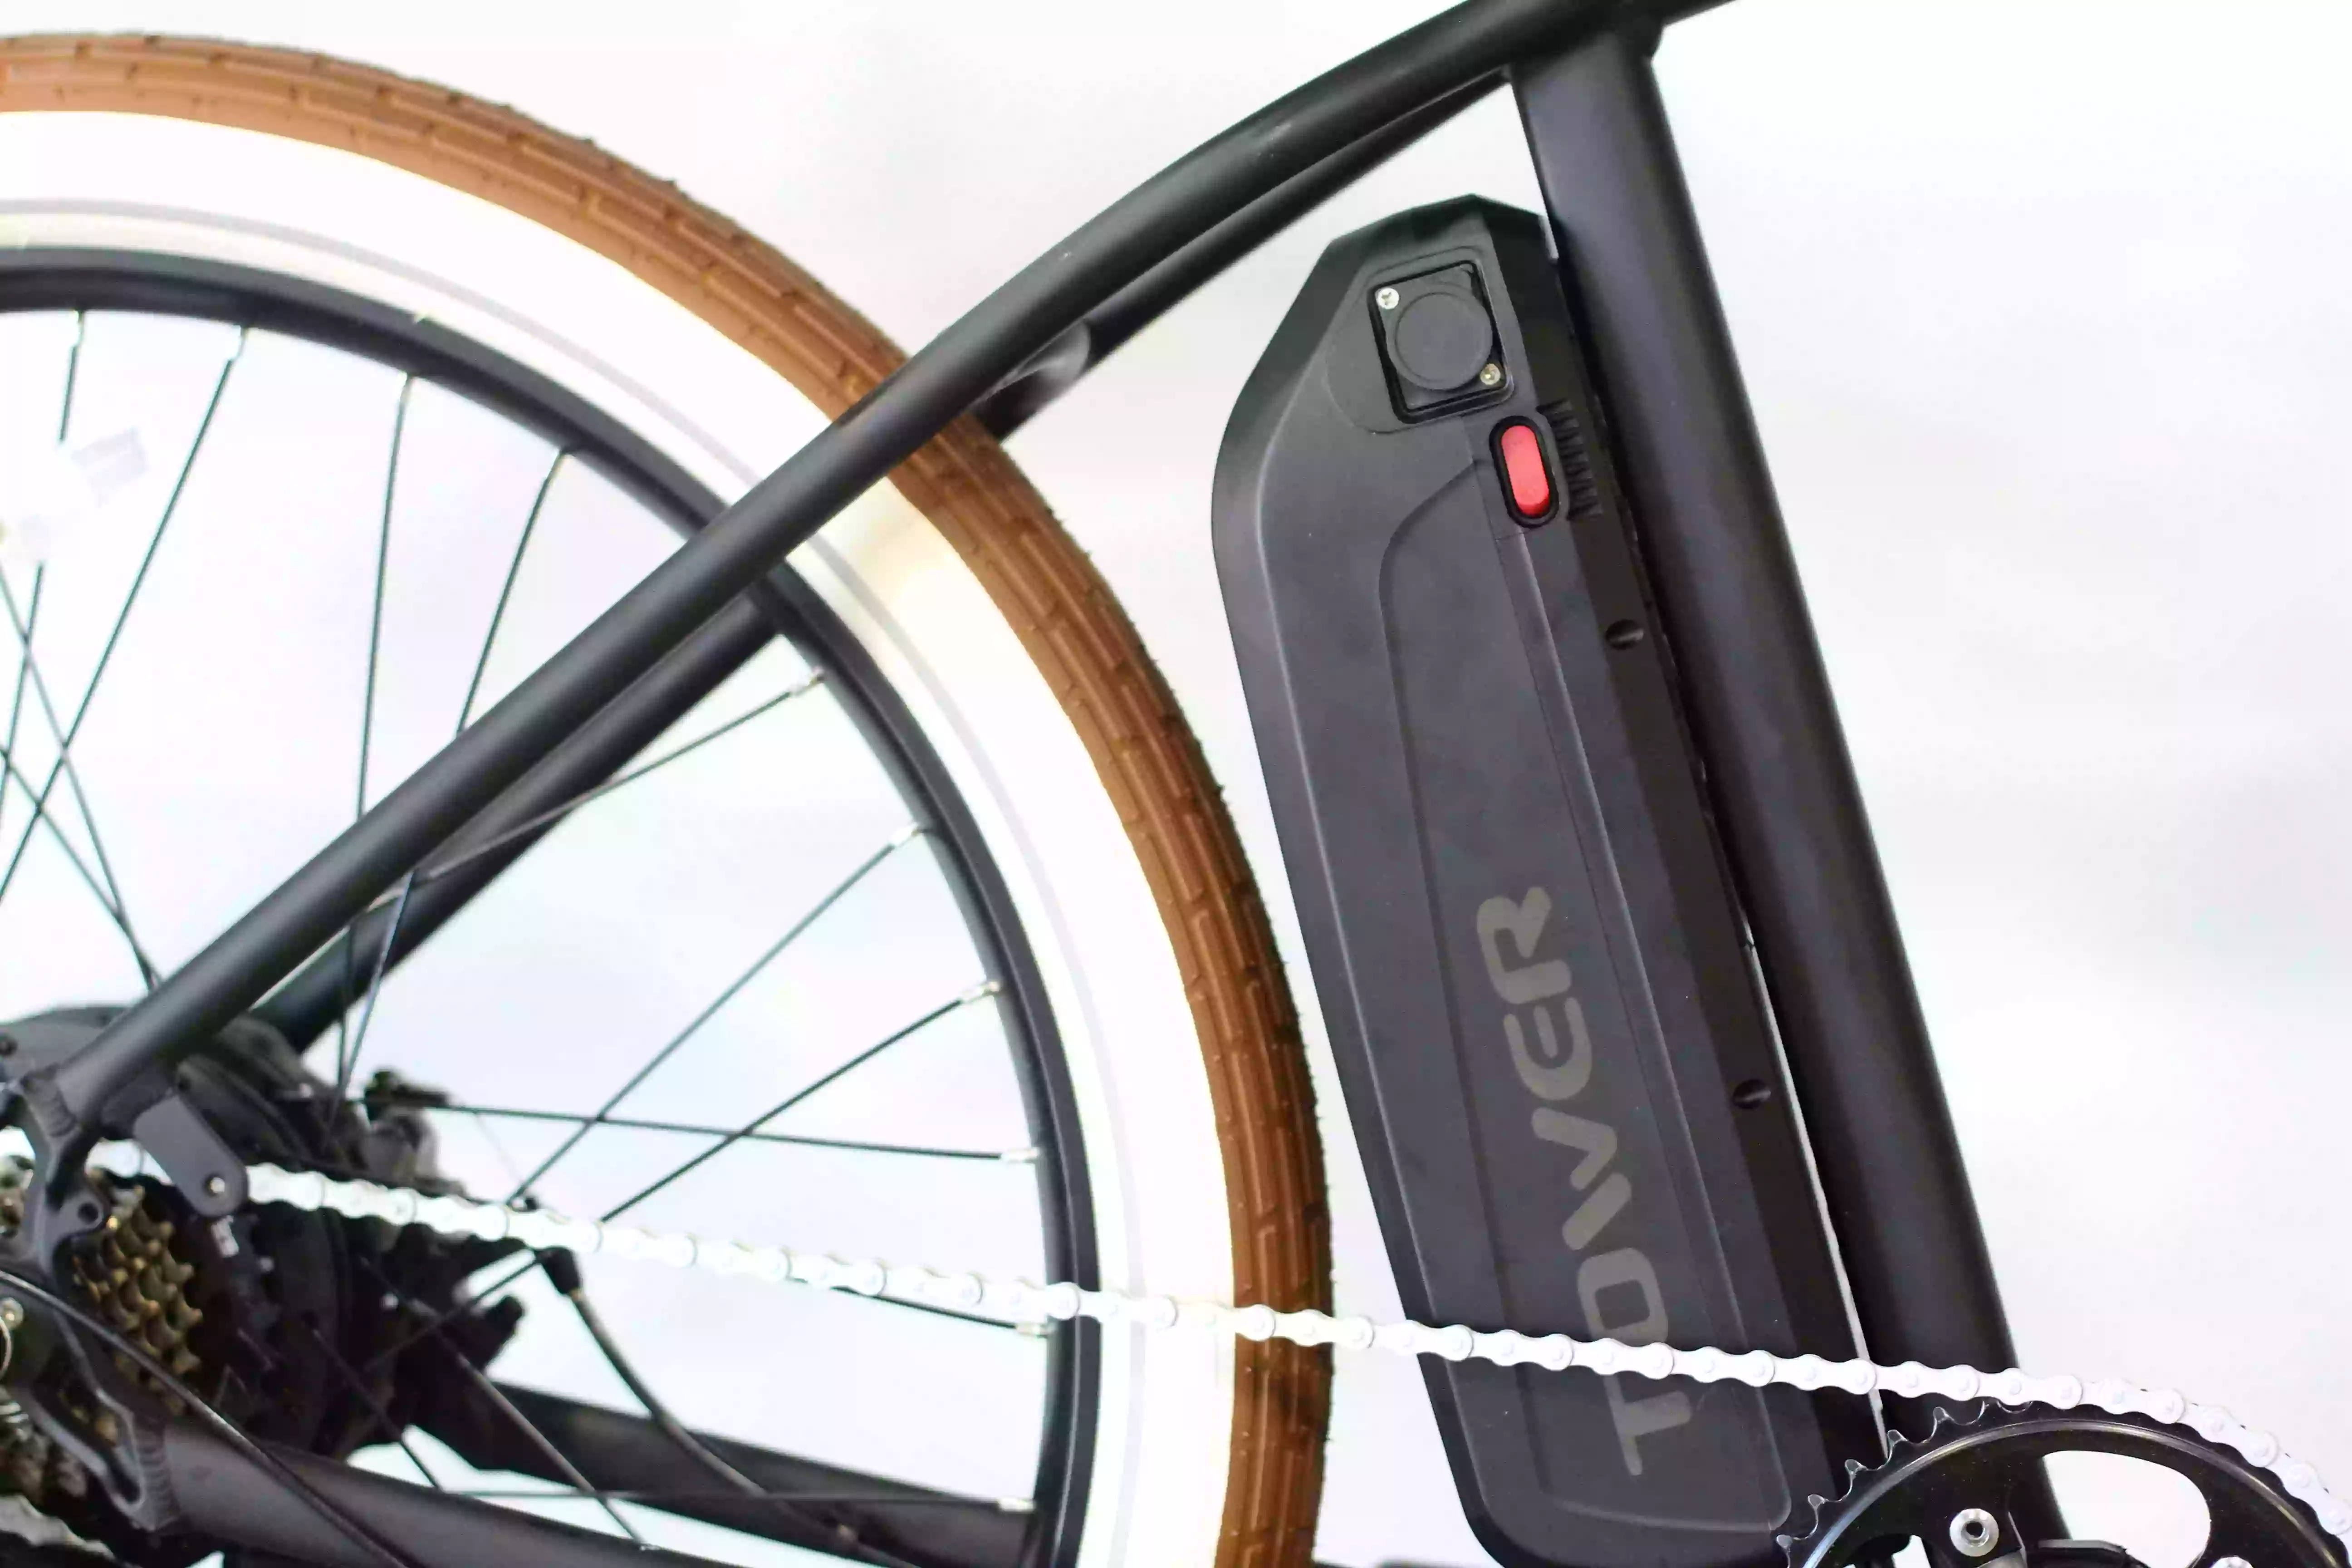
Thinking about swapping out your e-bike battery? You’re not alone! The battery is the heart of your electric bike, powering every ride and helping you cruise farther and faster. But replacing it isn’t just about popping in a new pack — doing it safely ensures your bike performs at its best and keeps you out of trouble.
In this guide, you’ll learn how to remove your old battery, install a new one safely, and dispose of or recycle the old battery responsibly. Whether you’re a seasoned rider or new to e-bikes, this step-by-step breakdown makes battery replacement simple and stress-free.
E-bike batteries typically last a few years, depending on use and care. When you notice shorter rides, slower acceleration, or your battery won’t hold a charge, it’s time for a replacement. But:
Replacing your battery the right way keeps your bike safe, reliable, and ready for your next adventure.
Ready to keep your e-bike powered up safely? Let’s get started!
Curious about what powers your e-bike? Knowing the basics about your battery can help you replace it safely and choose the best one when the time comes.
Most e-bikes use lithium-ion batteries because they’re lightweight, pack a lot of power, and last longer. Some older or budget models might use lead-acid batteries, which are heavier and less efficient but usually cheaper.
Here’s a quick comparison:
Most new e-bikes on the market today use lithium-ion, making them a smart choice for anyone looking for performance and reliability.
E-bike batteries come in different shapes and sizes, but here are the most common ones:
Knowing your battery type makes removal and installation easier because each type has different locking and mounting mechanisms.
On average, an e-bike battery lasts between 2 to 4 years or around 500 to 1,000 charge cycles. But don’t wait until it dies completely! Watch for these signs your battery might need replacing:
Understanding your battery helps you care for it better and makes replacing it a breeze when the time comes. Ready to learn how to remove and install your new battery safely? Let’s move on!
Before diving into your battery replacement, safety should always be your top priority. Handling e-bike batteries with care protects you and your bike from damage or accidents.
Always wear gloves and safety glasses to protect your hands and eyes from any accidental sparks or chemical leaks. These simple precautions can save you from unexpected injuries.
Work in a dry, well-ventilated area to avoid moisture buildup and ensure good airflow. This reduces the risk of overheating and keeps fumes from accumulating if anything goes wrong.
E-bike batteries are sensitive to heat and sparks. Make sure there are no open flames, cigarettes, or sparks nearby while you work. Safety first!
Before removing the battery, turn off your e-bike completely. Disconnect the power to prevent electrical shorts or shocks during removal and installation.
Only use manufacturer-recommended tools. Using the wrong equipment can damage connectors or the battery casing, leading to costly repairs or safety hazards.
Taking these safety steps will make your battery replacement smooth and worry-free. Ready to remove your old battery safely? Let’s go!
Ready to take out your old e-bike battery? Removing it carefully is key to staying safe and protecting your bike’s electronics.
Most e-bike batteries are secured with a lock or latch. Start by locating the release mechanism—this could be a key lock, a push button, or a sliding latch depending on your model. Use the key or follow the manufacturer’s instructions to unlock it.
Once unlocked, gently slide or lift the battery out of its mount. Before fully removing it, disconnect any power connectors by pressing release tabs or gently pulling plugs. Avoid yanking wires to prevent damage.
E-bike batteries are sensitive and can be heavy. Hold the battery firmly with both hands and avoid dropping or banging it. Also, be mindful not to touch exposed terminals to prevent short circuits.
If the battery feels stuck:
Forcing a stuck battery can damage both the battery and your bike.
Removing your old battery correctly is the first step toward a safer, smoother ride. Next up: installing your new battery the right way!
Installing your new e-bike battery might seem tricky, but with the right steps, it’s quick and easy. Getting it right ensures your bike runs smoothly and safely.
Before you start, make sure your new battery matches your e-bike’s model and specifications. Using an incompatible battery can cause poor performance or even damage the bike’s electrical system.
Carefully align the battery with the mounting bracket or frame slot. Slide it in smoothly, making sure it fits snugly without forcing it. Proper alignment helps keep the battery secure during your rides.
Once in place, connect the power leads firmly. Most connectors click or snap into place—ensure you hear or feel the connection. Loose connectors can cause power interruptions or damage.
Use the locking mechanism (key or latch) to secure the battery firmly. This prevents it from moving or falling out during your ride.
Turn on your e-bike and check that the battery indicator lights up and the motor responds as expected. If something seems off, double-check the connections and mounting.
With the battery safely installed, you’re almost ready to hit the road! Next, let’s talk about how to dispose or recycle your old battery responsibly.
Got an old e-bike battery? Disposing of it properly is just as important as replacing it. Let’s explore why safe disposal matters and how you can do it the right way.
E-bike batteries contain chemicals that can be harmful to the environment and human health if thrown in the trash. Improper disposal risks:
Recycling keeps hazardous materials out of landfills and allows valuable components to be reused.
Many regions have specific rules about lithium-ion battery disposal. Check your city or state government websites for:
Before recycling, take these steps:
You can often recycle e-bike batteries at:
Websites like Call2Recycle.org can help you locate nearby drop-off locations quickly.
Disposing of your old battery safely protects you, your community, and the planet. Ready to keep your e-bike rides smooth and sustainable? Let’s keep going!
Just got your new e-bike battery installed? Great! Taking care of it now means you’ll enjoy longer rides and get the most value out of your investment.
How you charge your battery can make a big difference. Aim to:
These simple habits help keep your battery healthy and extend its lifespan.
If you’re not riding for a while, proper storage is key. Keep your battery in a:
This prevents damage from temperature extremes and moisture.
Stay ahead of issues by inspecting your battery occasionally. Look for:
Catching small problems early can save you from costly repairs later.
Following these care tips ensures your e-bike battery stays strong ride after ride. Ready to enjoy longer, safer journeys? Find the perfect e-bike now!
Running into problems after replacing your e-bike battery? Don’t worry — these common issues have easy fixes that get you back on the road quickly.
If your new battery won’t fit securely in the mount, double-check that it’s the correct model and size for your e-bike. Sometimes, aftermarket batteries or older models might not match perfectly.
Tips to try:
If your e-bike doesn’t turn on after installing the new battery:
If it still won’t start, try removing and reinstalling the battery or consulting your e-bike’s manual.
Seeing warning lights or error codes can be confusing. These might mean:
Try cleaning the connectors and reseating the battery first. If problems persist, contact your bike’s customer support or a professional mechanic.
Troubleshooting your battery replacement is part of the learning curve. With these tips, you’ll stay confident and ready to enjoy your ride. Ready to ride? Find the perfect e-bike now!
Sometimes, replacing an e-bike battery is a simple DIY job. Other times, it’s best to call in a pro. Knowing when to ask for help keeps you safe and saves you time and money.
If you notice any of these, it’s a good idea to visit a professional:
Trying to fix these yourself could cause more damage or void your warranty.
Look for repair shops that specialize in e-bikes or electric vehicles. Certified technicians have the right tools and training to:
Check online reviews, ask for recommendations in local biking groups, or consult your e-bike manufacturer’s website for authorized service centers.
Knowing when to get expert help ensures your e-bike stays safe and reliable. Ready to ride? Find the perfect e-bike now!
Replacing your e-bike battery safely is all about following a few key steps: powering down your bike, handling the battery with care, using the right tools, and disposing of old batteries responsibly. These guidelines protect you, your bike, and the environment.
By sticking to best practices, you’ll extend your battery’s lifespan and enjoy many smooth, worry-free rides. Remember, taking the time to do it right is a smart move for any e-bike rider.
Ready to keep your e-bike powered safely and responsibly? Explore our e-bike buying guide and find the perfect ride to match your style and needs!
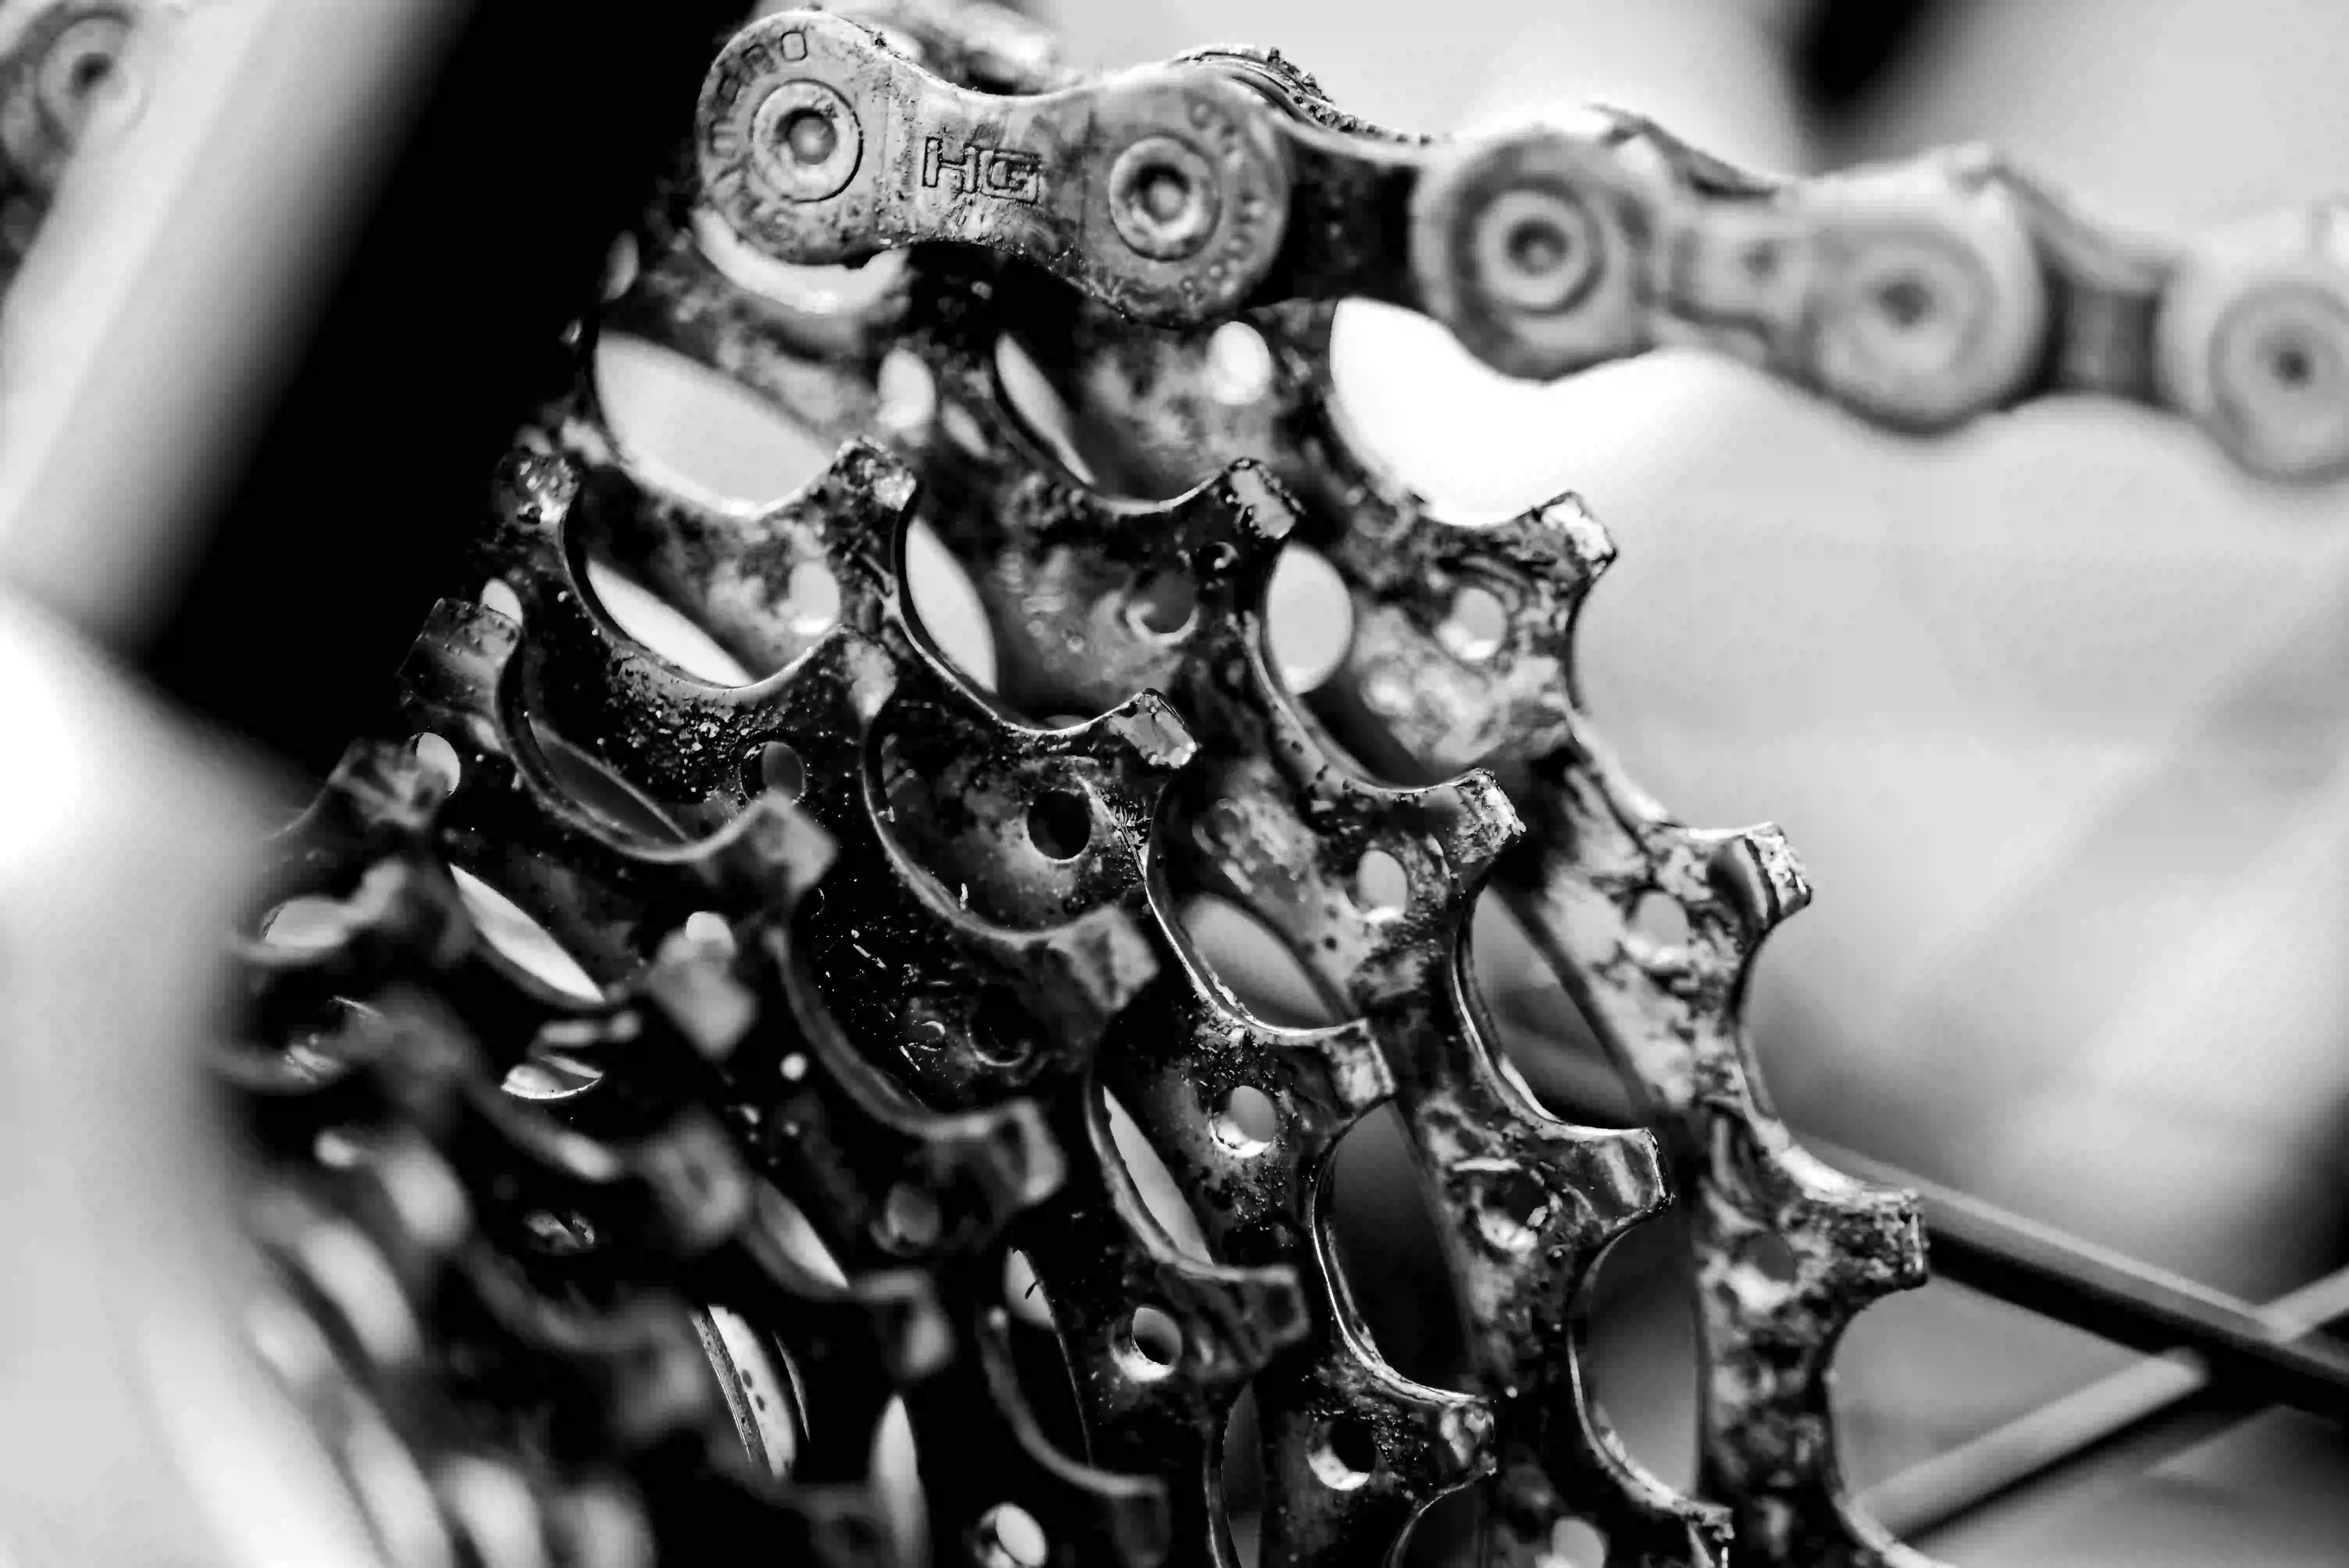
Got an e-bike? Then you’ve got a chain that works extra hard. With more torque and longer average rides than regular bikes, e-bike chains build up grime faster and wear out quicker. But the good news? A clean, well-lubricated chain is easy to maintain—and it makes a big difference.
Regular chain care means:
This guide will walk you through everything you need to know—what tools to use, how often to clean and lube, and the exact steps to do it right. Whether you're a daily commuter or weekend trail rider, a few minutes of maintenance can help your e-bike ride better and last longer.
Pro Tip: Set a reminder on your phone every few weeks to check your chain—it’s the easiest way to stay on top of your e-bike’s performance.
Ever feel like your e-bike isn’t riding as smoothly as it used to? It might be time to give your chain some attention. Just like any moving part, your chain wears down faster when it’s dirty or dry—and that can seriously impact performance.
In general, you should clean and lubricate your e-bike chain every 100–200 miles, depending on how and where you ride. If you’ve just finished a ride in the rain, mud, or dust, don’t wait—clean it as soon as possible to prevent premature wear.
If you're not tracking mileage, no worries. Your bike will let you know when it needs care. Watch (and listen) for these common signs:
Pro Tip: Wipe your chain with a clean rag after every ride. Even a quick wipe-down can extend the time between deep cleans.
Your cleaning schedule should match your riding habits. Here’s a quick breakdown:
Taking a few minutes to care for your chain is one of the smartest things you can do to keep your e-bike in top shape. It’s low effort, high reward—and your future self will thank you on your next ride.
Before you dive into cleaning your e-bike chain, make sure you’ve got the right tools on hand. The good news? You don’t need anything fancy—just a few basic supplies and a little elbow grease.
Having the right products not only makes the job easier, it also protects your drivetrain and keeps your ride performing at its best.
Here's what you'll want to gather:
Pro Tip: Don’t use dish soap or all-purpose cleaners—they often leave residue and aren’t strong enough to remove chain gunk.
If you're looking to upgrade your toolkit or just want to grab a reliable setup, here are some tried-and-true options (feel free to add affiliate links if you're monetizing):
With these tools ready to go, you’ll be set for a smooth and mess-free chain cleaning routine—no bike shop visit needed.
Before you start scrubbing or spraying anything, a little prep work can go a long way. Setting up your e-bike the right way makes the whole cleaning process easier, faster, and safer.
Plus, it helps prevent messes—because no one wants degreaser on their brakes or paint job.
Pro Tip: If you don’t have a stand, lean the bike against a wall with enough space to rotate the pedals backward. Just make sure it’s secure before starting.
Taking a minute to prep ensures your cleaning is more effective—and saves you from accidental drips or damage later on.
Now that your e-bike is prepped and ready, it’s time to tackle the gunk. Cleaning your chain is the heart of this process—it removes built-up grime that can wear down your drivetrain and kill performance. A clean chain doesn’t just look better, it rides better.
Pro Tip: Use a separate brush or rag to clean the cassette (rear cogs) and chainring (front gear) while you're at it. These parts get just as dirty as the chain and will transfer grime back if left untouched.
A clean chain is the foundation of a smooth, long-lasting e-bike drivetrain. It only takes a few minutes, but it can extend the life of your entire gear system by hundreds of miles.
Once your chain is clean and free of grime, don’t rush into lubrication just yet. The drying step is easy to overlook, but skipping it can undo all your hard work.
After rinsing or wiping off degreaser, make sure your chain is fully dry before adding any lube:
Why this matters: Lubricating a wet chain traps moisture inside the links, which can lead to rust and reduce the effectiveness of your lube.
Pro Tip: If you're in a hurry, aim a fan at the drivetrain or take the bike for a short spin to help it dry faster—just skip the lube step until you're back.
Proper drying is the last step before lubrication—and it’s a quick way to boost the effectiveness of everything you’ve done so far.
With your e-bike chain clean and dry, it’s time for the final step—lubrication. This is where the magic happens. The right lube keeps your drivetrain running smooth, protects it from rust, and makes pedaling feel effortless.
Not all chain lubes are the same. Picking the right one for your environment will help reduce wear and keep grime from building up too fast.
Pro Tip: If you're unsure, start with dry lube for general use. Just reapply more often if you're riding in rain or through puddles.
Lubing your chain doesn’t take long, but it makes a huge difference. With this final step, your e-bike is ready to hit the road—or trail—feeling faster, quieter, and smoother than ever.
Want to keep your e-bike in peak condition longer? These extra tips go beyond basic chain cleaning to help protect your entire drivetrain—and keep every ride smooth and worry-free.
Pro Tip: Keep a small maintenance log or set calendar reminders so you never forget when your chain was last cleaned, lubed, or replaced.
A little extra care goes a long way. These habits not only improve your e-bike’s performance—they save money on costly repairs and help you ride with confidence, every time.
Cleaning and lubricating your e-bike chain is pretty simple—but there are a few easy-to-make mistakes that can do more harm than good. Avoiding these pitfalls will keep your drivetrain running clean and efficient for the long haul.
Pro Tip: Stick to bike-specific products. They're designed to work with e-bike drivetrains and help you avoid the most common (and costly) mistakes.
By steering clear of these errors, you’ll spend less time fixing problems—and more time enjoying the ride.
Taking care of your e-bike chain is easier than you might think—and it takes less than 15 minutes. A quick routine of cleaning and lubricating will keep your drivetrain running smoothly and save you money on repairs down the line.
Make chain maintenance a regular part of your riding habits. Whether you ride daily or just on weekends, a clean chain means better performance, quieter rides, and longer-lasting parts.
Pro Tip: Set a reminder on your phone or calendar to check your chain every few weeks—consistency is key.
Ready to enjoy a smoother, more reliable ride? Start with simple chain care today and discover how much more fun your e-bike can be.
Looking to take your e-bike maintenance skills even further? These handy resources will guide you through everything from detailed inspections to professional tune-ups.
Pro Tip: Bookmark these resources to have quick access whenever your e-bike needs a little TLC.
Ready to keep your e-bike in top shape and enjoy every ride? Start exploring these guides and make maintenance a breeze.